

 682
682
Google Shared Drives are ideal for teams and departments that need shared access to files. Unlike files stored in a user's My Drive, files in Shared Drives belong to the team, not an individual.
This guide explains how to create a Google Shared Drive using your Otis College Google Workspace account.
1. Log in to Google Drive ( for more info on how to log in to Otis G-Drive )
- Go to https://drive.google.com or go to MyOtis. Under Campus Applications, there is a link for G-Drive.
- Enter your Username and Password, then click Login.
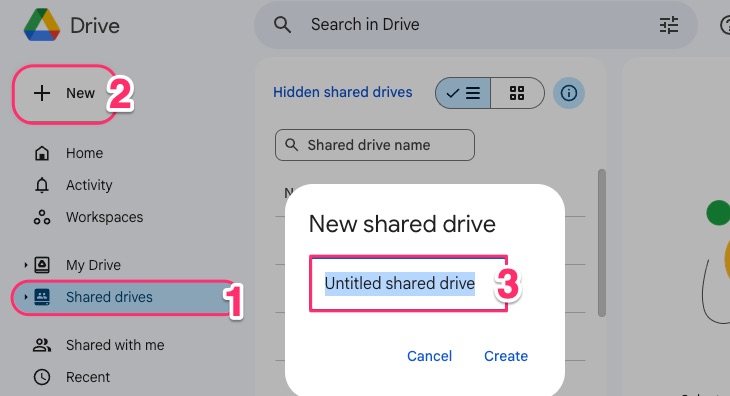
2. Create a New Shared Drive
- On the left menu, click Shared Drives ( You will see existing Shared Drives you have access to )
- Click the + New button near the top-left of the Shared Drives screen
- Enter a name for your Shared Drive (e.g., "Marketing Team 2025" or "Student Affairs Files")
- Click Create
3. Add Members
- After the drive is created, click the name of your new Shared Drive
- At the top, click Manage members
- Enter the names or emails of people you want to give access to
- Choose their permission level:
- Manage = full access, including managing members and settings
- Content manager = can edit files and organize folders
- Contributor = can only add/edit files
- Commenter = can view and comment only
- Viewer = can view files only
- Click Send
5. Upload or Create Files
- You can now drag-and-drop files or folders into the Shared Drive
- You can also use the + New button inside the Shared Drive to create Docs, Sheets, etc.
Tips & Best Practices
Naming: Use a consistent naming convention (e.g., “Department Name – Year”)
Permissions: Limit the number of Managers to prevent accidental changes
Ownership: Files in Shared Drives are owned by the drive, not the person who uploads them
Access: When staff leave, files stay within the team drive, avoiding loss of data

